Make Your Own and SAVE MONEY
Why would you go to a catering place and pay upwards of $80 when you can do it all for under $40 with a couple of tricks and creativity. I know this has nothing to do with cooking but I will teach you how to make things instead of having to buy them all the time. Plus this lets your inner artist also come out.
PLATTER
The vessel where your creation will be has to be take into consideration when prepping your items. You need to make sure your items are enough to cover the whole base. For our preparation today this plate is 16in diameter. In your mind separate the plate into 8 different sections like a pizza. Treating each slice different for each cold cut.
 |
| Each section will handle a cold cut. |
CHOICE OF INGREDIENTS
Whenever I choose to make a platter I take into consideration of what the people I am making one for like. Not everyone is going to like ham or salami or roast beef so you want to make sure you make it appealing for everyone.
Whenever I choose to make a platter I take into consideration of what the people I am making one for like. Not everyone is going to like ham or salami or roast beef so you want to make sure you make it appealing for everyone.
 |
| CHEESE Clockwise Yellow American, White American, Meunster, Mozzarella |
 |
| MEATS Clockwise Ham, Mortadella, Roast Beef, Genoa Salami |
 |
| OLIVES/BREAD Clockwise Black Kalamata, Green Casteveltrano, Baguette |
INGREDIENTS
All these are full slices of each. I ordered 1/2 Lb of each and ate the rest as they never go to waste here.
6 Slices of Roast Beef
10 Slices of Genoa Salami
8 Slices of Ham
10 Slices of Mortadella
8 thicker Slices of Meunster Cheese
8 thicker Slices of Yellow American
8 thicker Slices of White American
10 Oz Mozzarella Cheese Ciliegine(Cherry) Size
10 Oz Green Casteveltrano Olives
7 Oz Kalama Olives
1 Baguette
START TO PLATE
 |
| Don't forget the pizza |
**NOTE---Keep all the cheese in the refrigerator as it is easier to handle a cold piece of cheese**
Fold in half towards you
Roll loosely from left to right
Place 3 rolls on your "slice"
In descending order stack the rest making a pyramid shape

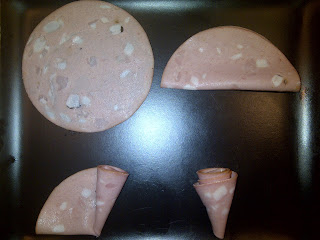
Fold the Genoa Salami in half
Fold it again to form a fan
If you want a fancier look, roll by holding the middle and it forms a flower shape
Turn your platter 180 degrees and place the Genoa Salami directly across from the other meat
In the picture I started with 4 quarter fold on the outside and "flowered" the rest until I got to the center.
Make sure you keep a space in the middle
Use this to coordinate the colors of your meat Beef and Salami match, Ham and Mortadella match
Place slice of ham towards you
Fold towards you
Roll loosely from left to right
Turn the platter 90 degrees and place Ham in the slice closest to you
Set three rolls on the outside of your "slice"
Place another three on top and to the front of those
End with two more on top and to the front like pictured on right
**Detailed version of the flower fold**
Fold Mortadella in half
Start to roll loosely from right to left using the center as an axis until you get to the other side
This forms the flower
Turn your platter 180 degrees
Place your flower as shown starting with four and in descending order until you reach the middle
Always keep in mind to leave a set space in the middle
Take the cheese out of the refrigerator
Using only the Yellow and White American cheese
Place a slice of Yellow forming a square in front of you
Take a slice of White and place it on top of the Yellow forming a diamond
Repeat this until you have stacked all the American Cheese
Take attention to detail in making sure they line up perfectly and that you end up with a White slice of cheese on top this will make a difference in a minute
Using the Yellow cheese as your guide cut from tip to tip
Repeat and cut to have four equal stacks of cheese
Placing your thumb in the tip of the stack(where the center would be in the cheese) gently push back to fan out the cheese.
Alternate colors by fanning with a different cheese color on top
Place fans on vacant spaces
Stack the Meunster cheese and slice like shown
Use the same technique of fanning on the Meunster
Place the Meunster under the American fan
Place the Mozzarella Cheese in space left in the middle of the platter
Using the Green and Black Olives garnish the voids between the meats and cheeses making a pattern if you like.
(Notice the ball of mozzarella at the end of each Black Olive line)
BE CREATIVE!!!
OH WAIT DID HE FORGET THE BREAD!!!!!
No I did not just take your sharpest knife much better if it is serrated.
Slice in an angle your loaf in 1/4 in thick pieces.
Slice in an angle your loaf in 1/4 in thick pieces.
Place them in a decorative pattern
Plate your bread next to your
CATERED COLD CUT PLATTER
Serve and ENJOY
Thank you for taking your time to read this. If you have any comments please post them. Questions, suggestions, hate mail, fan mail or anything you can write to me CookingMyBrain@hotmail.com.
See you later
Leo


